Showing posts with label healthy. Show all posts

Wednesday, 12 November 2014

Pesto Scrambled Eggs

I've had a bit of an egg obsession recently. I bought 2 10 packs of eggs last week to make pancakes for my friend and I as the perfect winter hangover cure- yes, I was that confident that they were going to go well...It's a good thing I took extra precautions since said friend managed to drop one box and smash half of them up. Anyway once the pancake experiments were over I was left staring Monday in the face with 10 eggs and 5 days to use them. By day number 4 of scrambled egg on toast I was getting very very bored and after a scroll through instagram finally found some egg-spiration in the form of pesto scrambled egg. Hey, if it's good enough for Millie Mackintosh...


Pesto Scrambled Eggs

Ingredients: (serves 1)

  • 2 eggs
  • Splash of milk
  • 1 1/2 tsp butter
  • 1-2 tbsp pesto depending on how much flavour you want
  • salt and pepper, to season

Method:

  • Heat a frying pan on a medium heat with the butter. Meanwhile crack the eggs into a bowl and beat until the yolks are completely mixed. Add the milk and pesto and whisk in. Save a bit of pesto to drizzle on the top of the eggs.
  • Season with salt and pepper then pour the egg mix into the frying pan and cook about 30 seconds. At this point the bottom of the egg should be starting to harden, so grab a spatula and get scrambling!
  • Scramble for about 5-6 minutes depending on how firm you like your eggs.
  • Drizzle some pesto on top and serve with a bit of toast!

Saturday, 1 November 2014

Loaded Sweet Potato

My housemate introduced me to sweet potato a few weeks ago when she cooked me a romantic dinner of stuffed chicken, roasted vegetables and sweet potato wedges. I was skeptical at first- they look far too luminously organge for my liking. It's like yellow tomatoes- tomatoes are red, not yellow. Potatoes are not bright orange. Cabbage is not red.
Well anyway, I'm now a complete convert and have been harassing her every dinnertime with what I think are pefectly legimate questions. Our evenings have sounded something like this: "Can I bake it?" "Do I really keep the skin on?" "Can you peel the skin off for me anyway?" "It sounds like it's going to blow up, are you sure 10 minutes in the microwave is legit?" I think she's starting to regret ever getting me to try it...
I bought a whole pack from Lidl the other week and have spent the past few dinnertimes concoting various sweet potato dishes but this is by far the best. It makes for a far more flavoursome and indulgent-feeling take on a jacket potato. You'll never look at tuna jackets in the same way ever again!

Loaded Sweet Potato

Ingredients (Serves 1)

  • 1 sweet potato
  • 1 1/2 tbsp creme fraiche
  •  1 tbsp pesto
  • 1 fillet of salmon
  • Splash of cooking oil

Method:

  • Preheat the oven to 180 degrees celsius. Wash the sweet potato under a tap then stab several times with a fork. Put in the microwave for 5 minutes on high. Meanwhile, mix together the creme fraiche and pesto in a bowl.
  • Once the 5 minutes is up turn over the sweet potato then put back in the microwave for a further 5 minutes. Meanwhile heat a frying pan on a medium to low heat with a small amount of cooking oil, then fry the salmon fillet on a low heat for about 8 minutes depending on how high the heat is. Turn over every minute or two using a spatula to ensure one side doesn't burn.
  • When the sweet potato is finished in the microwave take it out very carefully and use oven gloves- it will be very hot! Transfer to a baking tray and smother with the pesto and creme fraiche sauce then bake in the oven for about 4 minutes.
  • Take out the oven, cut up the salmon into bite-sized chunks and spread over the top of the sweet potato jackets.


Friday, 31 October 2014

Stewed Apples and Oats

I've been running out of interesting breakfast ideas for ages. Each morning I come downstairs mildly delusional still, grab the bowl, pour in the porridge and bang it in the microwave. 1 minutes 30 seconds later and I'm piling the same old slop into my mouth whilst watching bbc news. But then this morning everything came to a head. After staring at the bag of porridge for a good two minutes wondering if I really could spoon this into my mouth for the 100th time in a row I hit upon an idea. I've always loved stewed apples and had a few granny smiths in the back of my cupboard so why not combine the two? Best part is it tastes like crumble, and I'm never going to grumble about crumble in the morning! It was so tasty I boxed up the rest and had it in a container for lunch- may have got a few odd looks in the library but they'd be on my side if they tasted it. It may not look like much but then again neither does the stewed apple at the bottom of a crumble!


Stewed Apples and Oats

Ingredients: (Serves 1)

  • 1 large green apple or 2 small granny smiths
  • 1 tbsp brown sugar
  • 4-5 tbsp oats
  • 1 tbsp honey
  • 1/2 cup of water

Method:

  • Peel the apple (I actually forgot to do this but I think it would be slightly nicer peeled) then chop into small chunks, removing any seeds. Place the apple chunks into a small saucepan with the water and sugar.
  • Cook on a low heat with a lid over the pan for about 10 minutes, stirring every few minutes. The apple should be soft and squidgy by this point. Use a potato masher to mash up into smaller pieces then add the honey and oats and stir. You may need to add a little more water at this point to prevent the mix from becoming too dry.
  • Cook for a further 3-4 minutes allowing the oats to soak up some of the moisture. Taste and if necessary add a little bit more sugar. Serve up and enjoy! This can be enjoyed hot or cold, and should keep for about a day.

Friday, 24 October 2014

Pork Wellington in Butternut Squash Puree

Normally I'm not a massive fan of pork. It's fairly tasteless, I always end up overcooking it and inevitably end up wishing I had just splashed the cash on steak instead. But I'm a total convert when it comes to this show-stopping dish. It is a lot of effort but for a celebration dinner with an autumnal feel this is the perfect meal!


Pork Wellington in Butternut Squash Purée 

Ingredients: (makes 1 large Wellington)

  • 1 pork fillet (about 1 lb in weight)
  • 1 carrot
  • 1/2 a leek
  • 1/2 a butternut squash
  • 1 courgette
  • Salt and pepper, to season
  • 4 leaves fresh coriander 
  • Pinch of sage 
  • 1 tsp sugar
  • Dash of milk, to brush the pastry 
  • Handful of flour
For the pastry - this is the BBC Good Food Basic Shortcrust Pastry recipe:
  • 225g plain flour
  • 100g butter (diced)
  • Pinch of salt

Method:

For the Pastry:
  • Sift the flour into a large bowl, add the butter and rub in with your fingertips until the mixture resembles fine breadcrumbs.
  • Stir in the salt, then add 2-3 tbsp water and mix to a firm dough. Knead the dough briefly and gently on a floured surface. Wrap in cling film and chill while preparing the filling.
For the filling:
  • Pre-heat the oven to 200 degrees celsius. Roughly chop the leek, carrot, courgette and butternut squash. You will need to peel the carrot and butternut squash prior to chopping it up. Roast the vegetables in the oven for 25 minutes on a baking tray sprayed with a little olive oil spray or covered in a splash of cooking oil. 
  • Once roasted, place the cooked veg into a blender and blend. You may need to add a small amount of cold water to enable the veg to be blended into a thick purée. This should make an amount that is enough for the dish plus some leftovers- it makes a great dip to be accompanied by some tortilla chips for lunch the next day! 
  • Add the seasoning to the purée along with the sugar and salt and pepper, and mix in. Set aside the purée and allow to cool.  
  • Moving on to the pork fillet: season the fillet with salt and pepper and dust with a small sprinkling of flour. 
  • On a sheet of baking parchment, roll out the pastry into a rectangle large enough to wrap the pork fillet in. Leaving a gap of around 2cm around the edges, spread a layer of the purée onto the pastry. Brush the edges of the pastry with milk then place the pork fillet on top of the pastry and roll up like a giant sausage. Seal the overlap and seal the ends. 
  • Use the baking parchment to lift the Wellington onto a greased baking tray. (Using the parchment to lift it should stop it from breaking.) Glaze the Wellington with milk before baking in the oven at 180 degrees celsius for 45 minutes. 
  • Once cooked, remove from the oven and allow to stand for 5 minutes before cutting into slices and serving. 


Thursday, 23 October 2014

Butternut Squash Lasagne

Lasagne is one of my absolute favourite foods, and when served with a bit of rocket and garlic bread, man that hits the spot! It's one of those dishes that would be my ideal date food although as of yet no boy has ever passed the realms of spag bol and bacon sarnies when attempting to cook for me. (Take that as a challenge, boys!) Sometimes however it gets difficult to think of ways to spice a lasagne up. Every lasagne starts to taste exactly the same regardless of whether you've just whipped it out of the oven or been served a giant dish of it in a cute gastro-pub. So, for an fresh take on lasagne try this butternut squash lasagne. It gives a twist to the traditional taste whilst being better for you than a standard lasagne dish. Win win!


Butternut Squash Lasagne

Ingredients (Serves 5)

  • 500g pack of lean mince
  • 2 medium carrots
  • 1 medium courgette 
  • 1 leek 
  • 1/2 a butternut squash
  • 2 tins of chopped tomatoes (or for low histamine, red pepper sauce made with 5 peppers- click here for link to the recipe)  
  • 3 tsp italian mixed herbs (contains oregano, basil, thyme, parsley, sage and marjoram) 
  • 1 tsp sugar
  • 1 1/2 balls of mozzarella 
  • 55ml double cream 
  • 125g mascarpone
  • Salt and pepper, to season 

Method:

  • Dice the leek, carrot and courgette and place into a frying pan. Add in the mince then cook on a medium heat until the meat browns and the vegetables start to get brighter in colour. Constantly stir as the meat and vegetables cook to ensure even cooking and that nothing burns. 
  • Put the fried ingredients into a large saucepan and add the chopped tomatoes/ red pepper sauce along with all the herbs and the sugar. Add some salt and pepper to your taste in order to season the sauce. Cook for 15 minutes on a low heat. 
  • Meanwhile slice the end of the butternut squash and peel the skin off. Slice into 1/2cm wide strips and steam for 10-15 minutes. The aim is for the butternut squash to soften but not too much. In order to steam, place an inch of boiling water into a pan on a medium heat with a steamer containing the butternut squash on top. Make sure to put a lid over the steamer. 
  • Remove the mozzarella cheese from its packaging and slice into thin, wide chunks. 
  • To make the lasagne layers: Add 1/3 of the mince sauce into the bottom of a deep oven dish until the bottom is fully covered and you have a fairly thick layer. Place a layer of the butternut squash chunks on top until the mince is fully covered then spread half the mascarpone over the butternut squash. To make the mascarpone easier to spread, heat in the microwave for 20-30 seconds. Drizzle half of the cream into the gaps and over the butternut squash. 
  • Repeat these steps to make one more layer. After this layer add the remaining mince sauce then on top of this place the slices of mozzarella on top. This layer should contain slightly less mince sauce than the other two. 
  • Bake in the oven on 180 degrees celsius for 20 minutes. 


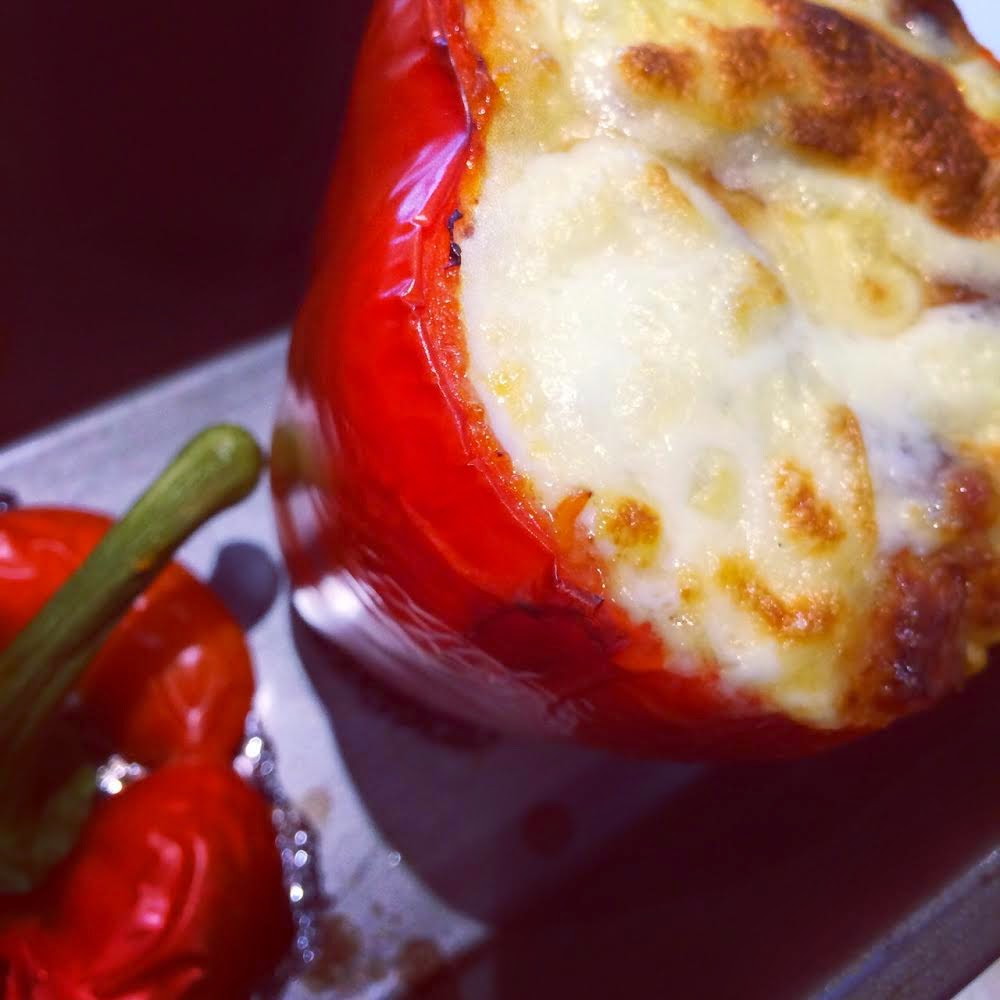
Low Histamine Stuffed Peppers

The problem with cooking for one is that I always end up throwing away fresh veg. It sits in the back of my fridge, hidden behind a tub of yoghurt, and festers for a good week before I remember that I actually need to use it up. This problem is compounded by the inability of Lidl to stock anything other than bulk-buy goods. You want one red pepper? Better buy a bag of 3 that gives you a bonus yellow and green pepper that you neither need or want. Everyone knows red peppers are the tastiest ones! So this recipe has been born from my efforts to use up all my peppers in order to make space in my fridge for the kilogram bag of carrots and pack of 5 sweet potatoes I just bought.


Low Histamine Stuffed Peppers 

Ingredients: (Serves 1)

  • 5 heaped tbsp pre-cooked red pepper sauce (click here for recipe)  
  • 4 heaped tbsp of any pre-cooked roasted vegetables (courgette, red onion, carrot, pepper, leek, butternut squash- the more the better!) 
  • 2 heaped tbsp frozen sweetcorn 
  • 1 red pepper
  • 1/3 ball of mozzarella 
  • 3/4 tsp black pepper
  • 1 tsp mixed italian herbs (contains basil, thyme, marjoram and oregano)
  • Pinch of salt

Method:

  • Pre-heat the oven to 200 degrees celsius. 
  • Put the pre-cooked roasted vegetables, frozen sweetcorn and pre-cooked red pepper sauce into a pan. If you are using red pepper sauce that has been frozen be sure to defrost it fully first. Add in all the herbs and spices then stir together and cook for at least 10 minutes on a low heat on the hob. 
  • Meanwhile prepare the pepper by chopping the top of the pepper off and scooping out the insides with a knife. Make sure that all the seeds have been got rid of and all the white bits have been sliced off. 
  • Once the sauce has been cooked, spoon the sauce into the pepper. You may have some sauce left over however this is better than overfilling the pepper. Place on a flat baking tray, or if the pepper is unable to stand freely, in an oven dish with the sides supporting the pepper. Bake for 10 minutes.
  • Whilst the pepper is cooking remove the mozzarella from its packaging and slice the mozzarella cheese into thin chunks. Once the pepper has been removed from the oven, place the mozzarella over the top of the pepper as shown in the picture above and cook for a further 10 minutes, or until the cheese is sufficiently melted. 


Sunday, 12 October 2014

Low Histamine Meatballs

Are you one of those people that serves up spaghetti bolognese whenever you need to fix up a quick meal for some friends? Hold you hands up- we all do it. Just last tuesday I had an impromptu dinner party and started cooking at 7.55 when the guests were due to arrive at 8- it was a very hectic 5 minutes. Chopped tomatoes and mince was spread over half the kitchen worktops, topped off with a bit of slightly burnt shop-bought garlic bread. However, if you have a few more minutes than that handmade meatballs are a great way to look like you've made that bit more effort whilst still making something very easy that costs the same sort of amount and uses ingredients you've probably got at the back of your fridge and cupboard. We served ours with low histamine red pepper sauce (click here for the link) but you can go traditional and serve with a tomato and garlic sauce.


Low Histamine Meatballs 

Ingredients: (makes about 13 meatballs)

  • 250g lean minced beef
  • 1 tsp basil
  • 1 tsp oregano
  • 1/2 tsp marjoram 
  • 1/2 tsp ginger
  • 1/2 tsp thyme 
  • 1 tsp crushed black pepper 
  • Pinch of salt 

Method:

  • Preheat oven to 200 degrees celsius. Mix everything up in one big bowl. Then squeeze the mince into small balls- you should be able to make about 13. You need to get messy and use your hands for this! 
  • Bake in the oven for 10 minutes. This may vary depending on how large/small your meatballs are.
For a variation, add in some mozzarella to the mix. 


Tuesday, 30 September 2014

Smashed Vegetables and Squash

I'm going to be honest with you here...this doesn't look like the most appetizing of things. In fact it's probably slightly reminiscent of baby food...I'm really selling it, I know. But then again, pea soup looks like it's been concocted by some sort of Hallowe'en character yet it's a surprisingly refreshing and popular lunchtime dish. And black pudding just looks completely inedible, yet virtually every northerner insists on including it in their fry up. (I accept this is a less convincing argument- Northerners put gravy on their chips for god's sake. Who thinks of that?!) So what I'm saying is don't judge the food by its looks because it tastes damn good!
Its filling, warming and tasty despite only having 200 calories per serving!


Smashed Vegetables and Squash

Ingredients: (Serves 1)

  • 225g butternut squash
  • 80g carrot
  • 40g leek
  • 65g broccoli 
  • 65g cauliflower 
  • 75ml x 4 boiling water 
  • 1 tsp sage
  • 1 tsp thyme
  • 1/2 tsp marjoram 
  • Salt and pepper, to season

Method:

  • Pre-heat the oven to 220 degrees celsius. Chop the leek, carrot and butternut squash into evenly sized chunks. You will need to peel the butternut squash and the carrots before cutting. Place on a baking tray sprayed with olive oil spray.
  • Bake in the oven for 20-25 minutes. Remove from the oven and place the cooked vegetables into a blender. Blend, adding 75ml of boiled water at a time through the blending process. You should need to do this 4 times (75ml x 4) however you may need to do this slightly more or less depending on how well blended the mixture becomes as you go along. If it is struggling to blend add more water. 
  • Add the seasoning and blend some more.
  • Chop the broccoli and cauliflower into small pieces whilst boiling a kettle. Place the broccoli and cauliflower chunks into a steamer over a pan of boiling water and steam for 8 minutes. 
  • Once the broccoli and cauliflower is cooked mix it in with the blended sauce. 


Thursday, 25 September 2014

Veggie Balls

Lets face it, it's difficult to eat the right amount of fruit and vegetables sometimes. It costs more than the haute cuisine offered up by your local takeaway on the corner and rarely leaves you feeling as satisfied. What's a soggy cucumber got over a ketchuped hot-dog? However, these little balls of veggie goodness most definitely do not feel like an effort to eat. Packed full of flavour plus a load of nutrients they make a great substitute for meat balls in tomato-based sauces or an impressive side-dish just as they are. For those on a low histamine diet simply mix with our red pepper sauce (click here for the link) as pictured below.


Veggie Balls

Ingredients: (makes approx 13 balls)

  • 5 oz grated carrot
  • 5oz grated potatoes
  • 5 oz grated courgette 
  • 2.5 oz leek 
  • 2 tbsp corn flour 
  • 50g crushed tortilla chips 
  • 1 tsp crushed peppercorns
  • 1 tsp basil
  • 1 tsp oregano
  • 1/2 tsp thyme
  • 1/2 tsp marjoram
  • 1/2 tsp ginger 
  • Pinch of salt 

Method:

  • Finely chop the leek then grate the carrot, potato and courgette. 
  • Spray some olive oil spray on a pan then fry the chopped vegetables on a medium heat for 8-10 minutes. Once cooked place the vegetables into a mixing bowl and add the salt and pepper. Then add the oregano, basil, thyme, majoram and ginger. 
  • Once the spices have been mixed in add the corn flour. Meanwhile put the tortilla chips into a freezer bag and use a rolling pin to crush them. Once the spices are mixed in use your hands to mould the mixture into small individual balls then roll each ball in the crushed tortilla chips. 
  • Place in the fridge for 20 minutes to help the vegetable balls set before cooking. Preheat the oven to 220 degrees celsius.
  • Place the balls on a grill pan with a baking tray underneath and cook for 15 minutes. 


Saturday, 20 September 2014

Sticky Sesame Chicken

I don't understand people that eat plain chicken and rice. Who actually enjoys plain chicken and rice? For one thing said people almost inevitably choose chicken breast (the driest and least flavoursome part of chicken) then overcook it so that you can practically bounce it on the floor. They serve it up with long grain white rice (not even basmati- far too flavourful) and then instagram their food with endless hash-tags along the lines of #healthy #fitness #cleaneats #yummy #foodporn. Whilst the first three hash-tags may be true the latter two most definitely aren't. If that's their idea of food porn I dread to think what their idea of actual porn is. Well, I'm here to save these people from themselves with a fairly healthy chicken and rice dish that can be made with ingredients almost everyone has in their cupboard, actually tastes good and is worthy of instagramming.


Sticky Sesame Chicken 

Ingredients: (makes 2 small portions or one large one)

  • 3 tbsp honey
  • 3 tbsp soy sauce 
  • 1.5 tbsp Heinz bbq sauce 
  • Small squirt of Heinz tomato ketchup 
  • 1 small tsp brown sugar 
  • 40g sesame seeds 
  • 1 large chicken breast/ 2 small chicken breasts 
  • 2 portions of basmati rice (see packet for portion guidelines) 
Note: this is the kind of sauce where you have to taste it as you go along to know if it's right. Don't just follow the amounts blindly. It's the kind of sauce where different people will want a different edge to the sauce. If you want it sweeter, add a little more honey. If it's too sweet, add a tad more soy. If you want more of a smoky bbq flavour or can taste the soy too much then add a little more bbq sauce. 

Method:

  • Dice the chicken into small chunks. Measure out the honey, soy, bbq, ketchup and sugar into one mixing bowl and mix. If the sauce is quite thin add a smidgen of cornflour and mix well. Don't worry if it is a little lumpy- this should go once the sauce is on the heat if you give it a bit of a stir. 
  • Weigh out the sesame seeds and place on a plate. Dip each chicken chunk into the sauce first then roll in the sesame seeds and put to one side. If the sesame seeds start sticking more to each other than the chicken, pour more sesame seeds onto the plate. They need to be quite dry to start with to stick to the chicken. 
  • When all of the chicken pieces have been coated boil the kettle and pour the portion of rice into a pan. Add the water, bring to the boil then simmer for 8-9 minutes, or according to packet instructions. 
  • Once the rice is on, heat a large frying pan on a medium heat and spray some cooking oil over it to stop the chicken sticking. Add the chicken and cook for 4-5 minutes until the chicken is cooked through. To check it is cooked cut one piece in half. It should not have any pink in the middle. Add the remaining sauce and stir. You may get a few burnt bits of sauce on the bottom- scrape these off as these are the most flavoursome bits! 
  • Serve up the rice, making sure to pour boiling water over the rice as you drain it to get rid of the starch. Then serve up the chicken over the top. 

Friday, 19 September 2014

Spinach Omelette

It has taken me a long time to master the omelette. Each time I would season it to perfection, whisk the eggs like a champion (I have the biceps to prove it) and get it to the perfect golden colour. But then, the moment would come to fold the omelette over in half. Each time I would approach this with steely determination. And each time disaster would strike. I'd have pathetic little drabs of omelette hanging off my spatula and my omelette would turn into an unappetising looking scrambled egg dish. You feel so defeated. You feel so feeble. An egg has beaten you. Not this time. Today was the day I finally folded an omelette. A proud moment.


Spinach Omelette 

Ingredients: (Serves 1)

  • 2 large eggs
  • Dash of milk
  • 2 large handfuls of spinach
  • Salt and pepper 
  • 1 tsp butter

Method:

  • Crack the eggs into a bowl and beat until you have a yellow-orange colour. Season the eggs with salt and pepper, add a splash of milk and whisk in. 
  • Heat the pan on a medium heat and add the butter. Once the butter has melted add in the spinach and cook until wilted. The spinach will break down a lot, so you may want to keep adding more in if it looks like quite a small amount as it begins to wilt. 
  • Once the spinach is wilted spread it out across the pan and then pour in the egg mixture. You may want to add in a little more butter first to prevent the egg mixture from sticking to the bottom of the pan. 
  • The omelette is cooked once the bottom has gone a golden brown colour and the top is cooked through but still a little gooey on top. Fold the omelette in half using a wide spatula then serve. 
  • Note: if the omelette is quite thick you may want to put the pan under a hot grill for a couple of minutes to finish off cooking the top of the omelette. For extra flavour, try adding cheese or some chopped chilli. 

Thursday, 18 September 2014

Healthy Chicken Nuggets

Whenever my house mates and I are hungover we go through the same ritual at about 12 in the afternoon. We collectively lie on the sofas and begin listing all the unhealthy fatty foods that would cure our hangovers nicely. Pizza, bacon sarnies, full fat coke...about 2 minutes in someone always pipes up with 'mcdonalds' to which someone else responds with 'oh my god! Lets go to the drive thru!' This would be a brilliant idea if the designated driver wasn't probably still over the limit...so, save the calories, fat and potential criminal record and make these healthy chicken nuggets instead!


Healthy Chicken Nuggets

Ingredients: (serves 2)

  • 25g cornflakes
  • 15g all bran 
  • 20g krackawheat crackers 
  • 1 tsp garlic granules
  • salt and pepper
  • 1 egg
  • 2 chicken breasts 

Method:

  • Preheat oven to 200 degrees celsius and line a baking tray with baking paper. 
  • Pour the cornflakes, all bran and crackers into a large freezer bag. Squeeze the air out and tie in a loose knot. Use a rolling pin to break up the ingredients into a fine dust. Do this by beating the bag gently with the rolling pin, and rolling the rolling pin firmly over the bag multiple times. It is important to break everything up so that it is very fine- it took us a good 5 minutes to get it just right. Add in some salt and pepper to season and the garlic and shake up.
  • Pour the nugget mix onto a plate. Break the egg into a bowl and beat.
  • Chop up the chicken into nugget sized chunks. Take each chunk and dip it into the egg first, then roll in the nugget mix until fully coated. 
  • Place each nugget onto the baking tray then bake in the oven for 20-25 minutes. 
  • Serve with lots of ketchup and bbq sauce! 

Wednesday, 17 September 2014

Quinoa Salad

As you can see I'm continuing the quinoa theme. When I find a new food that I like I'm like a child with a brand new toy- I bring it out to play with at every possible opportunity. Cue a load of quinoa salad experiments in the kitchen. Attempt number 1 went spectacularly wrong when I just read the serving size on the back of the packet as being 100g of quinoa, not realising the sneaky bit of text a bit further down informing me this meant 100g of its cooked weight. There I was rabbiting on to my mum about how amazing it was that so much quinoa only had 100 or so calories, before she burst my bubble and informed me just how wrong I was. Of course, it's still very low calorie, just not to the extent that I had first thought!


Quinoa Salad 

Ingredients (Serves 1)

  • 60g uncooked weight of quinoa
  • 300g water
  • 1/4 of a broccoli
  • 15g grated parmesan
  • Handful of rocket
  • 1 large egg
  • Balsamic vinegar, to drizzle 

Method:

  • Boil the water and add in a pan to the uncooked quinoa. Simmer for 20 minutes, stirring every few minutes or so. By the end of the 20 minutes the quinoa should have absorbed all of the water, although you may have to add a bit more water towards the end if the quinoa starts sticking to the bottom of the pan. Keep stirring to stop it from sticking. 
  • Using a separate saucepan, steam the broccoli for 7 minutes. (To steam broccoli, place a steamer and lid over a pan of boiling water). 
  • Whilst the quinoa and broccoli are cooking, spread out the rocket on a plate and grate the parmesan. 
  • Just before the broccoli and quinoa are ready to serve, boil the kettle again. Serve up the quinoa and broccoli then quickly pour the boiled water into the pan that had the steamer on top of it, crack in your egg and poach for 2-3 minutes, depending on how dippy you want the centre. 
  • Add the poached egg on top, sprinkle over the parmesan and drizzle with balsamic vinegar.